
- Тип техники
- Бренд
Просмотр инструкции конвектора Saturn ST-HT4017, страница 8
7
touch key to decrease the setting
time. The timing interval is 24 hours.
4. The operating of Rise or Increase
Key: You can touch key to
increase the temperature value.
5. The operating of Reduce or Decrease
Key: You can touch key to
decrease the temperature value.
INSTALLATION INSTRUCTIONS
Free-standing instructions
Before using the
heater as free
standing, it must
always be used
with feet
assembled and
in upright
position.. There
are two plastic
feet and eight
screws in the
carton.
1. Put the heater on a flat table
and align the bottom of the heater with
the edge of the table.
2. Install the 2 feet on the
bottom of the heater.
3. Put 4 screws into the holes for
each foot.
4. Fasten the screws with a
screwdriver.
5. All the processes done, put
the heater on the floor, you can use it.
Wall mounting instructions
CAUTION: the heaters shall be installed
at least 0.5m above the floor and 1.0m
under the ceiling.
The feet must be removed before
mounting the appliance on the wall.
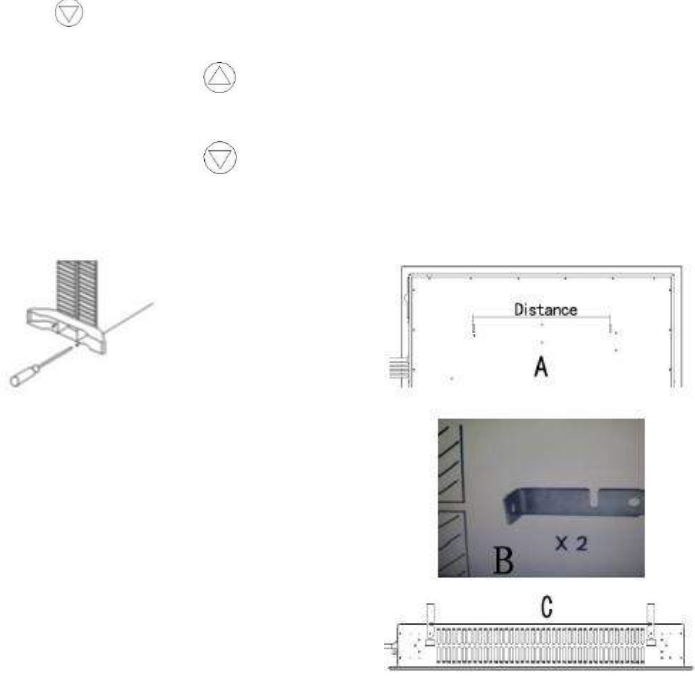
1. Measure the distance between
the two slots situated at the back of the
appliance (see picture A).
2. Drill two holes at the same
distance in the wall and insert a plug in
each hole you just drilled. Place the
brackets facing the holes as indicated
in picture B and attach them in this
position with the screws supplied.
3. Before attaching the appliance
on the brackets, attach the two other
brackets underneath the appliance as
indicated in picture C.
4. Attach the appliance on the
wall. To do so, hold it in such way that
the slots are facing the brackets; insert
the appliance halfway onto the
brackets until the appliance can go
down into the grooves of the brackets.
5. As soon as the appliance is
positioned correctly, take a pencil and
mark a dot on the position of the hole
of each bracket situated underneath
the appliance.
6. Than take off the appliance by
proceeding the other way around
compared to step 4 above.
7. Drill a hole in the wall on each
dot you just marked and insert a plug
in each hole.
8. Attach the appliance back on
the wall as indicated in step 4.
Insert screws through the brackets
underneath the appliance and tighten
without forcing.
MAINTENANCE
1. Turn off the power switch in
the rear of the unit.
2. Unplug the unit and let it cool
completely.
3. To keep the heater clean, the
outer shell may be cleaned with a soft,
damp cloth. You may use a mild
detergent if necessary. After cleaning,
dry the unit with a soft cloth. CAUTION:
DO NOT let liquid enter the heater.
4. DO NOT use alcohol, gasoline,
abrasive powders, furniture polish, or
rough brushes to clean the heater. This
may cause damage or deterioration to
the surface of the heater.
5. DO NOT immerse the heater in
water.
6. Wait until the unit is
completely dry before use.
Ваш отзыв будет первым