
- Тип техники
- Бренд
Просмотр инструкции швейной машинки JANOME SE 7519, страница 15
11
РАЗДЕЛ 3.
ОСНОВНЫЕ ШВЕЙНЫЕ ТЕХНИКИ
Прямая строчка
Установки на машине:
1. Строчка А / B
2. Лапка универсальная для зигзага
3. Натяжение верхней нити 2 – 6
4. Длина стежка 1,5 – 4
5. Ширина строчки 0 или 5
z Поднимите прижимную лапку и расположите
ткань в соответствии с направительными линиями
на игольной пластине.
Опустите иглу в ткань.
Опустите прижимную лапку и отведите нити назад.
Нажмите на ножную педаль.
Слегка только направляйте ткань вдоль линий
на игольной пластине, ткань должна сама проходить
под лапку.
x Для закрепления конца шва нажмите на кнопку реверса
и прошейте несколько обратных стежков.
Поднимите прижимную лапку и снимите ткань, отведя
нити назад.
c Подведите нити вверх к нитебрезателю. Обрезайте
нити на достаточной длине для начала нового шва.
Изменение направления шитья
Остановите машину, поверните на себя маховое колесо
и опустите иглу в ткань.
Поднимите прижимную лапку.
Поверните ткань вокруг иглы и смените по желанию
направление шитья. Опустите прижимную лапку
и продолжайте шить.
14
w e
q
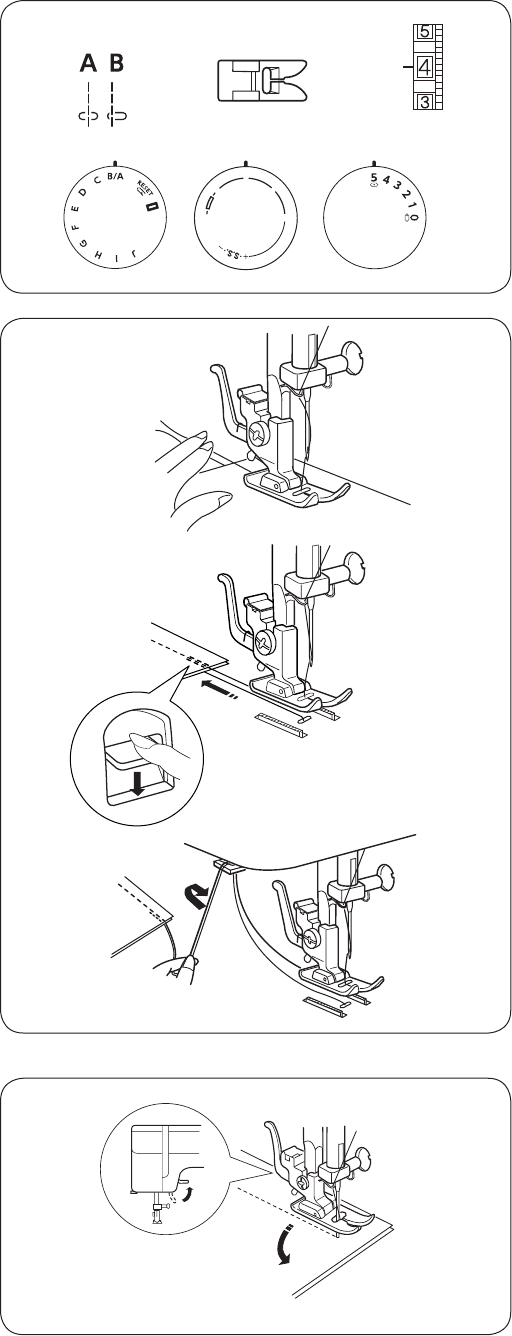
SECTION 3. BASIC SEWING
Straight Stitch Sewing
q
Pattern selector: A/B
w
Presser foot: Zigzag foot
e
Thread tension: 2–6
r
Stitch length: 1.5–4
t
Stitch width: (0) or (5)
z
Raise the presser foot and position the fabric
with its edge lining up with a seam guide line
on the needle plate.
Lower the needle into the fabric.
Lower the presser foot and smooth the
threads toward the back.
Depress the foot control.
Gently guide the fabric along the guide line
letting the fabric feed by itself.
x
For fastening the end of seams, press the
reverse stitch lever and sew several reverse
stitches.
Raise the presser foot and remove the fabric,
drawing the threads to the back.
c
Cut the threads with the thread cutter.
The threads are now the proper length to
begin sewing the next seam.
To Change the Direction
Stop the machine and turn the handwheel
toward you to bring the needle down into the
fabric. Raise the presser foot.
Pivot the fabric around the needle to change
sewing direction as desired.
Lower the presser foot and continue sewing.
r t
C
D
E
F
G
H
I
J
K
L
A
1
2
3
4
0
1
2
4
3
5
0
14
w e
q
SECTION 3. BASIC SEWING
Straight Stitch Sewing
q
Pattern selector: A/B
w
Presser foot: Zigzag foot
e
Thread tension: 2–6
r
Stitch length: 1.5–4
t
Stitch width: (0) or (5)
z
Raise the presser foot and position the fabric
with its edge lining up with a seam guide line
on the needle plate.
Lower the needle into the fabric.
Lower the presser foot and smooth the
threads toward the back.
Depress the foot control.
Gently guide the fabric along the guide line
letting the fabric feed by itself.
x
For fastening the end of seams, press the
reverse stitch lever and sew several reverse
stitches.
Raise the presser foot and remove the fabric,
drawing the threads to the back.
c
Cut the threads with the thread cutter.
The threads are now the proper length to
begin sewing the next seam.
To Change the Direction
Stop the machine and turn the handwheel
toward you to bring the needle down into the
fabric. Raise the presser foot.
Pivot the fabric around the needle to change
sewing direction as desired.
Lower the presser foot and continue sewing.
r t
C
D
E
F
G
H
I
J
K
L
A
1
2
3
4
0
1
2
4
3
5
0
z
x
c
14
w e
q
SECTION 3. BASIC SEWING
Straight Stitch Sewing
q
Pattern selector: A/B
w
Presser foot: Zigzag foot
e
Thread tension: 2–6
r
Stitch length: 1.5–4
t
Stitch width: (0) or (5)
z
Raise the presser foot and position the fabric
with its edge lining up with a seam guide line
on the needle plate.
Lower the needle into the fabric.
Lower the presser foot and smooth the
threads toward the back.
Depress the foot control.
Gently guide the fabric along the guide line
letting the fabric feed by itself.
x
For fastening the end of seams, press the
reverse stitch lever and sew several reverse
stitches.
Raise the presser foot and remove the fabric,
drawing the threads to the back.
c
Cut the threads with the thread cutter.
The threads are now the proper length to
begin sewing the next seam.
To Change the Direction
Stop the machine and turn the handwheel
toward you to bring the needle down into the
fabric. Raise the presser foot.
Pivot the fabric around the needle to change
sewing direction as desired.
Lower the presser foot and continue sewing.
r t
C
D
E
F
G
H
I
J
K
L
A
1
2
3
4
0
1
2
4
3
5
0
Ваш отзыв будет первым