
- Тип техники
- Бренд
Просмотр инструкции утюга Saturn ST-CC0232, страница 4
6
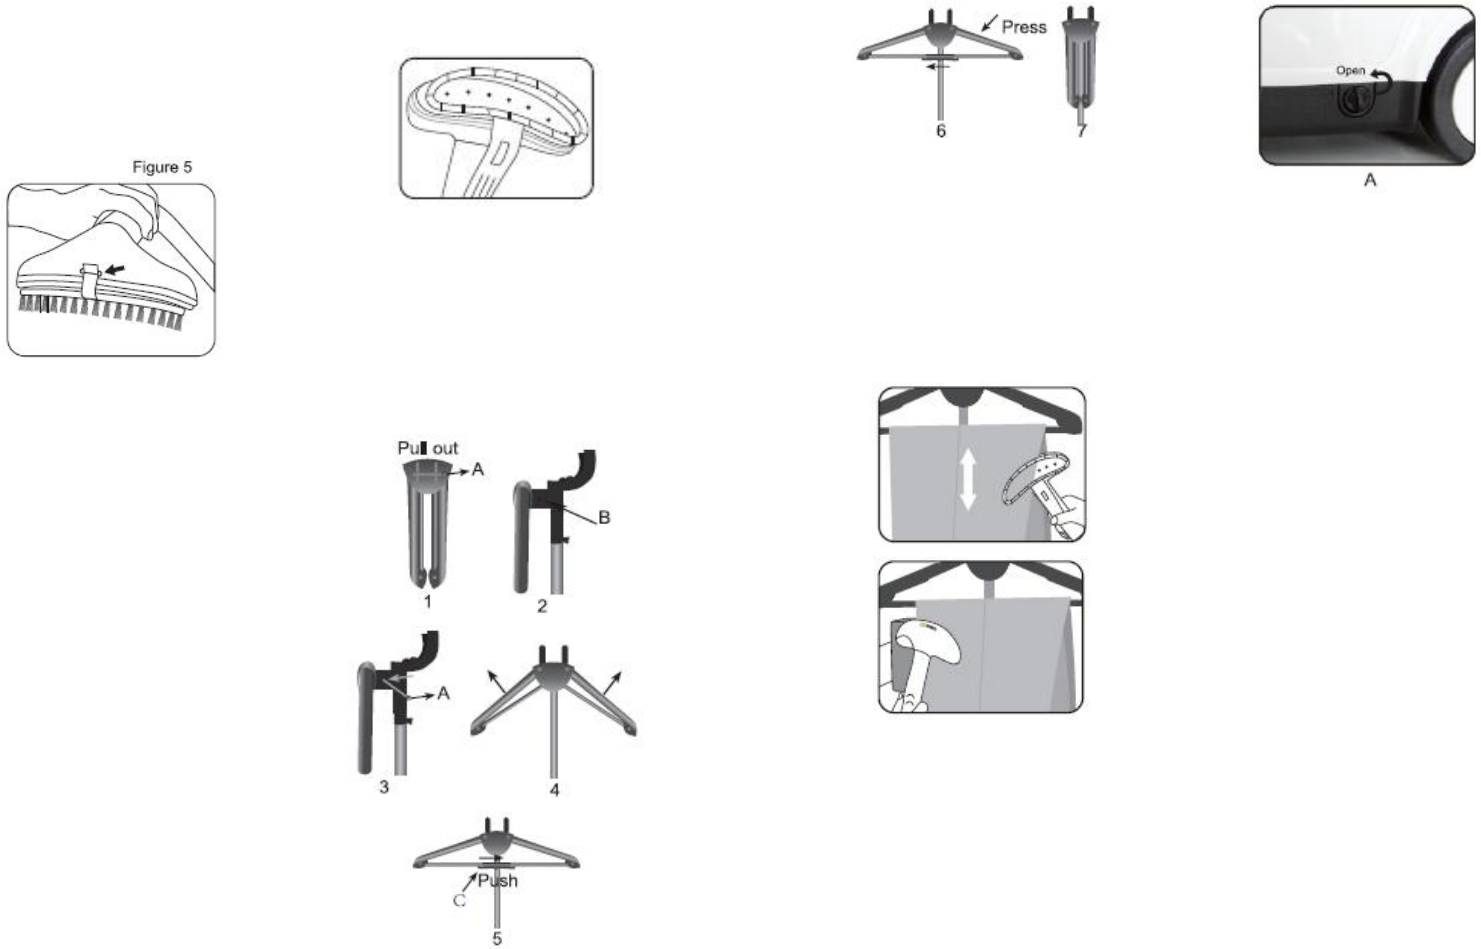
2. Fabric brush’s pegs aim and
insert the holes on the Steam spout.
See Figure 5.
3. Push the brush and firm it in
place.
CAUTION:
Do not install the accessory while
steam emitting from the Steam spout
and avoid burns.
INSTRUCTIONS FOR USE
1. Unplug the Power Cord, and
turn the Switch to the “Off or “0”
position.
2. Remove the Water Tank, turn
it upside down, and unscrew the Valve
Cap. Fill the Water Tank with cool
water, and replace the Valve Cap. Hot
water is forbidden. To prolong the
lifetime of your steamer, we
recommend using distilled or
demineralized water. Place the water
tank back into the unit and make sure
it is sitting properly and securely in
the flume. Do not let the steamer
working with a dry water tank or else
you can damage the unit.
3. Plug the unit into an electrical
outlet.
4. Turn on the Switch. Verify
that the light is on the switch.
Steam should start flowing from the
spout in approximately 45 seconds.
5. Please select an appropriate
programs (1,2,3 or 4) according to
different materials of the clothes for
better ironing performance. We
suggest:
Program 1 for silk program 2 for
polyester. Program 3 for cotton and
program 4 for linen.(this function Only
for 4 powers program models).
6. When you finish your steam
iron, turn the switch on the “Off” or
“0” position and pull plug out from the
outlet.
INSTALL PARTS
Pants clamp installation:
Lean the pants clamp, let flute corner
towards on the fix-panel of steam
nozzle, and clip pants clamp gently
through the corner, pants clamp can
be fixed on steam spout.
Folding rack installation (Optional
Parts):
1. Take out folding racket, pull
out pin(A);
2. Ensure hole of hanger aim on
the folding rack hole(B), put the
pin(A) through the hole. Fix the
hanger and folding rack;
3. Pull and open the folding
rack, push bar(C) from left to right
and fix the crossbar (C);
4. When finish Ironing, push
Bar(C) from right to left and fold rack.
7
IRON THE TROUSERS SEAM
In order to iron the trousers seam
straight and smooth when using our
garment steamer, please use the
pants clamp. Make the connection to
be open between the spout and pants
clamp, grip the pants clamp and iron
the trousers seam vertically, then
trousers seam can be very straight
and smooth. Also you can use Mini
ironing board at the back side and
spout at front side, it will be easy and
fast also for ironing trousers and
pants.
CLEANING AND STORAGE
We recommend you follow this
procedure at least once per month to
extend machine working periods;
1. Turn the Switch to “off or “O”
position.
2. Unplug the unit from the
power outlet.
3. Ensure the steamer to cool
for at least 30 minutes.
4. Remove the Hose and shorten
the Telescopic Pole, then set them
aside.
5. Remove and drain the Water
Tank. Rinse the water tank with fresh
water, and drain completely.
6. Drain the steamer by
removing the Drain Plug and emptying
the contents. Picture A.
7. Flush the unit by filling the
Water flume and the Hose Connector
with fresh water and draining
completely. Put the Drain Plug back.
8. Wrap the Hose around the
Telescopic Pole one time. Place the
Steam spout on the steam hanger.
9. Store in a cool and dry place.
REMOVING MINERAL DEPOSIT
Impure water containing mineral or
sediment may cause mineral deposit
leaving in the steamer, which will
affect the free flow of steamer. To
reduce the occurrence of mineral
deposit in the steamer, demineralized
or distilled water is recommended.
To remove the mineral deposit, please
follow below procedure:
1. Turn the unit off, and unplug
the power cord.
2. Remove the hose and pole
from the unit.
3. Drain the Water flume and
empty water from the Water Tank.
4. Mix a solution of 50% vinegar
and 50%wateror Citric acid.
5. Slowly pour the water-
vinegar or citric acid into the Hose
Connector or water tank about 0.6
Liters;
6. Let the unit power on and
work for 5-6 minutes.
7. Cool the unit for about 30
minutes, drain the solution out of the
Water Reservoir by removing the drain
plug and allowing the liquid to drain
into a sink or tub.
8. Drain the solution out of the
Hose Connector by tilting the unit over
a sink or tub and pouring the water
out of the Hose Connector.
9. Pour clean water in the Hose
Connector or Water flume inlet and
drain it. Repeat this step until the
vinegar odor dissipates.
10. Reassemble the unit and
operate normally.
IF THIS PROCEDURE DOES NOT
RETURN THE UNIT TO NORMAL
OPERATION, THE UNIT MAY NEED
SERVICING.
Ваш отзыв будет первым