
- Тип техники
- Бренд
Просмотр инструкции мультиварки Saturn ST-MC9184, страница 4
6
5) Menu setting
According to the food, choose one of the
buttons on the control panel. After se-
lecting cooking program, timer indicator
and menu indicator flash synchronously.
At this moment, you can press “+ ” or
“ -” to adjust the coking time. Please
refer below “COOKING GUIDE”.
* PRESET («Отсрочка старта»)
a) If preset time is not required, pass
this step.
b) If present time is required, press
“PRESET” button once to increase the
timer by 30 minutes. The maximum
preset time is 23 hours and 55 minutes.
After 23 hours and 55 minutes, the time
will start a new cycle again. You can
long-press the button to increase the
preset time quickly. Display shows the
default cooking time. Chosen program
will be indicated by light indicator.
Cooking process will start after preset
time is over.
By pressing button at the control panel
choose the cooking program.
Cooking mode and default correspond-
ing time will be on display.
To change cooking time press “+ or “–“.
Timer indicator will flash 5 times and
the cooking time will start.
7
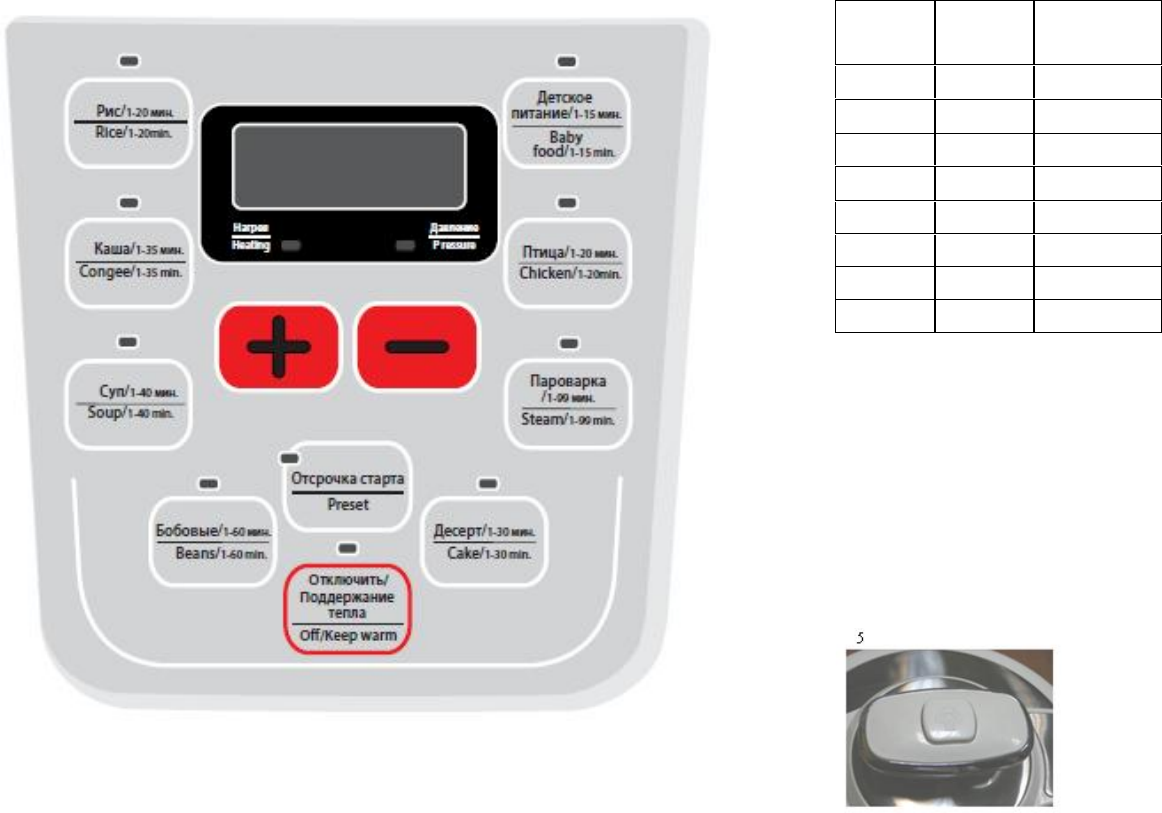
Program
Default
Time
Time change
range
Rice
12 minutes
1-20
Congee
15 minutes
1-35 minutes
Chicken
12 minutes
1-20 minutes
Soup
25 minutes
1-40 minutes
Beans
40
1-60
Baby food
5
1-15
Steam
55
1-99
Cake
30
1-30
* Off/ Keep Warm
(Отключить/Поддержание тепла)
a) When the cooking process is over,
the product keep warm function will
turn on automatically.
b) At any stage, you can just press
“OFF/ KEEP WARM “button to stop the
current operation menu and return back
to original stage.
* Take Out The Food
a) When the cooking process are over,
the product will signal 3 times and the
display will be on continual warm func-
tion.
b) By pressing the button at the center
of the handle (See Figure 5.) release the
steam.
c) Unplug the power supply.
d) Hold the handle firmly, turn it clock-
wise to the clamping position and then
lift it. (See Figure 1).
6) Cleaning Methods
1. Remove the plug before cleaning
2. Clean the lid, including seal belt,
pressure relief valve, filter, vent, floater,
floating valve and wipe it with towel.
3. Clean the body with soft towel. Never
soak it in water for cleaning or spay
water over it.
4. Take off the water collector and clean
it with a wet towel.
5. Clean the inner pot with a sponge or
non-metal soft brush, and then dry it
with towel.
6. Clean the pressure relief valve and
the holes with soft brush to ensure
smooth flow of steam during the cook-
ing process.
7) Safety Rules
1. Never use the utensil along with in-
flammable products or in a humid loca-
tion.
2. The amount of water or food added
to the inner pot should be determined in
line with step 2 in the section “HOW TO
USE THIS PRODUCT”.
3. Never damage the seal belt or re-
place it with other rubber belt or tension
belt.
4. Never twist the inner steel ring with
hand or other tools with force. If the
steel ring slips off place, do stop using
and replace a new lid.
5. Never attempt to open the lid with
force until the floating valve falls down.
6. Never put any weight on the pressure
relief valve or replace it with other sub-
stitutes.
7. The bottom of inner pot and heating
plate surface should be kept clean. Nev-
er heat the inner pot on other thermal
sources or have it replaced with other
cookers.
8. The inner pot is covered with anti-
sticking coating. To avoid scratch,
wooden or plastic ladles are recom-
mended.
9. The maximum period for heat preser-
vation is 24 hours. However, the dura-
tion less than 6 hours is recommended
to ensure delicious taste.
10. It is abnormal if there is large
amount of steam escaping from the
edge of lid during cooking. Remove the
plug immediately and send the utensil
to authorized service station for mainte-
nance.
11. In cooking, if an alarm sound is
heard and the following malfunction
code is displayed, stop using immedi-
ately and send the utensil to authorized
service station for maintenance.
12. In transit, it is recommended to hold
the ears instead of the handles for safe-
ty.
13. Never disassemble the utensil by
yourself or make replacement with ac-
cessories other than ours.
Ваш отзыв будет первым