
- Тип техники
- Бренд
Просмотр инструкции духового шкафа Korting OKB 792 CFX, страница 32
DESCRIPTION OF TYPES OF COOKING PROGRAMMERS
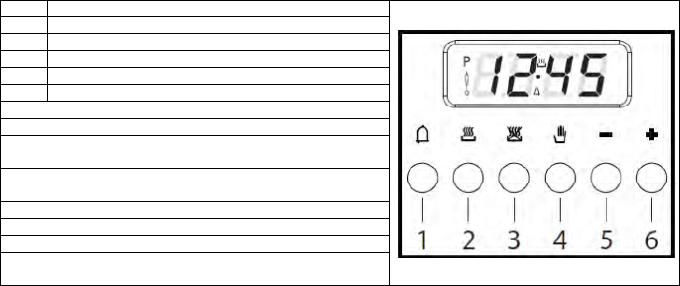
ELECTRONIC PROGRAMMER with 6 buttons for 5-functions and 9-functions ovens.
(Figure 3.1 and 3.3)
Description of buttons
1 Time
2 Cooking time
3 End of cooking time
4 Manual position
5 Scroll forward through all program numbers
6 Scroll back through all program numbers
Description of illuminated symbols
“AUTO” flashing – Programmer in automatic position, but
not programmed
“AUTO” always on - Programmer in automatic position, with
program inserted
“2” (symbol) – Automatic cooking functioning
“1” (symbol) – Timer in use
“2” and “AUTO” (both flashing) – Program error
No symbol on, except the clock numbers – programmer set
manually
Digital clock
Indicates hours (0-24) and minutes. Immediately after connection (as well as after a black-out), “0.00” will
flash on the display.
To set the correct time, press buttons “2” and “3” simultaneously, and at the same time, press one of the
buttons “+” or “-“ until you have the correct time.
The speed with which the numbers change on the display will increase a few second after pressing the
buttons “+” or “-“.
Manual cooking mode (without using the programmer)
To use the oven without the help of the programmer, you will need to cancel the flashing “AUTO” message.
To do so, just press button “4”.
If the “AUTO” message is steady, showing that the oven has been programmed, you will need to cancel the
program by pressing the button “4” so that the display shows “0”.
Automatic cooking mode (start and end of cooking time)
1) Program the length of cooking time with button “2”
2) Program the end of cooking time with button “3”
3) Select the desired temperature using the temperature regulation knob and select the desired function
using the function selector knob. The “AUTO” symbol on the display will indicate that the oven has been
programmed.
Practical example:
You want to cook for 45 minutes, ending at 14.00
- By pressing “2” you set 0.45 on the display
- By pressing “3” you set 14.00 on the display.
After these operations the current time and the “AUTO” symbol will appear on the display, to indicate that the
programming has been memorized.
At 13.15 (14.00 less 45 min.) the oven will start automatically, and during cooking the symbols “2” and
“AUTO” will be shown on the display.
At 14.00 the cooking will stop automatically. An acoustic signal will sound. You can stop the acoustic signal
by pressing button “1”.
Semi-automatic cooking mode
A) Programming the cooking time.
B) Programming the end of cooking time.
30
Ваш отзыв будет первым
Вопросы пользователей
Поиск:
по производителю
по типу техники
по модели
Сортировать:
по дате

c ответами

Ольга
03 октября 2019, Рязань
На дисплее рядом с часами горит ключ и ни чего не работает ни одна кнопка ни духовка.
Что делать? В инструкции ни чего не нашла.
0 ответов
Ответить

 0
0