
- Тип техники
- Бренд
Просмотр инструкции плиты Indesit K6G20 (R), страница 15
15
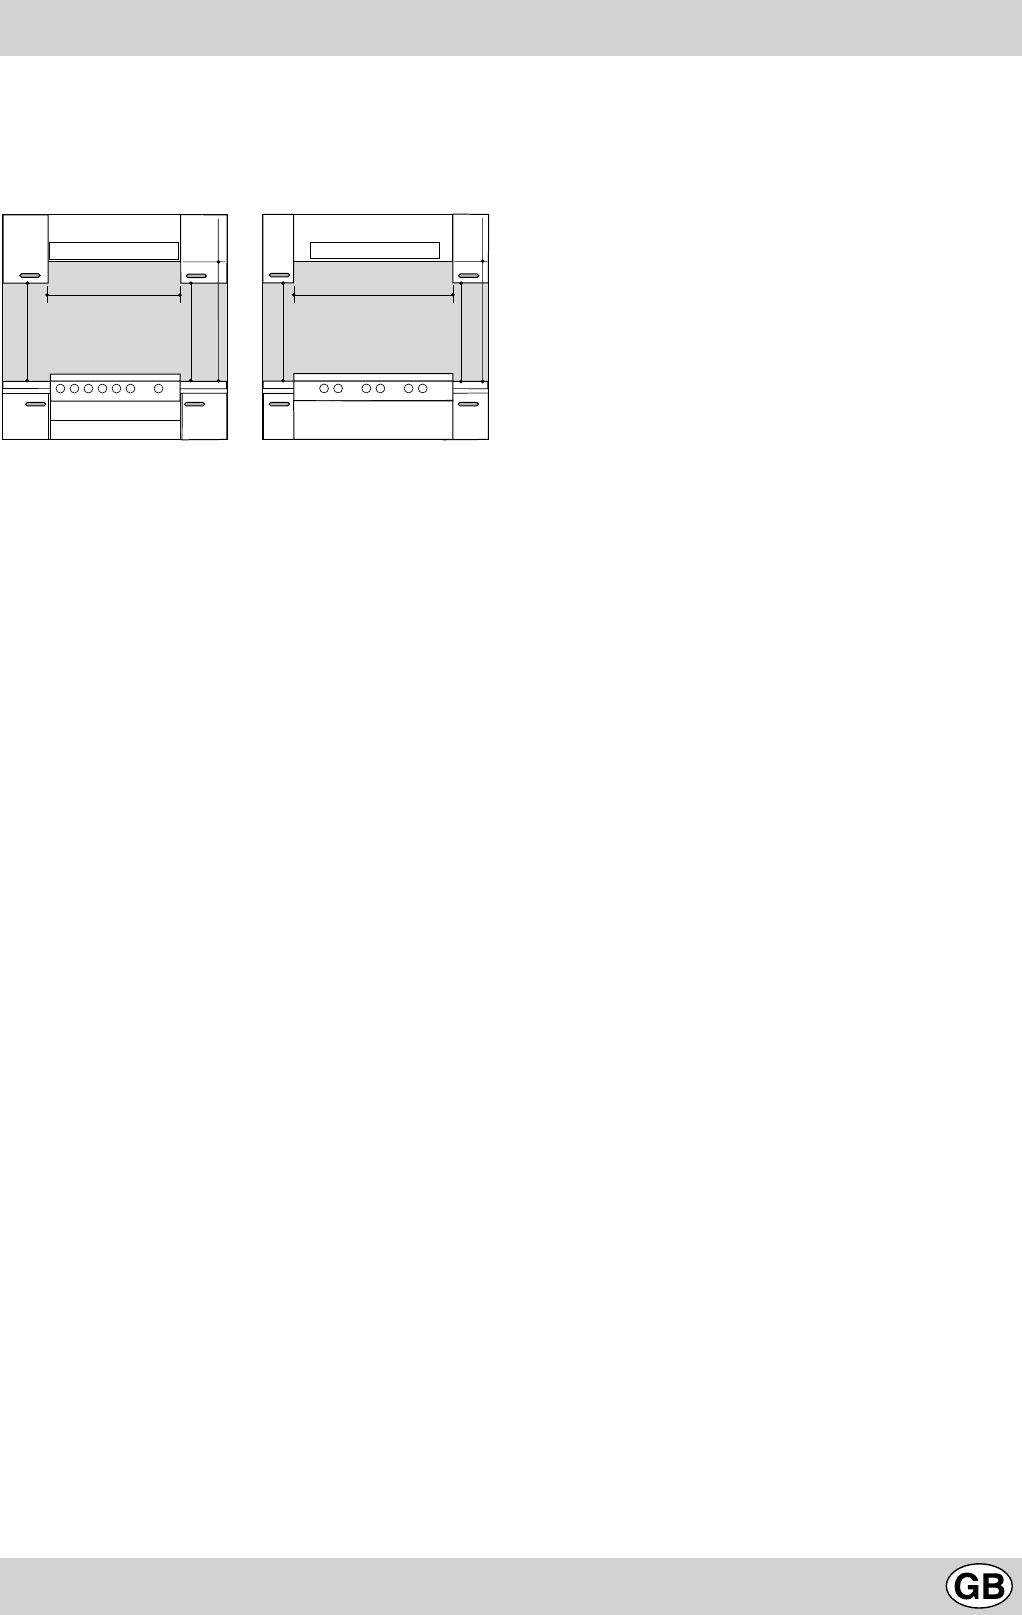
c) If the hood is installed below a wall cabinet, the latter
must be at least 700 mm (millimetres) above the sur-
face of the hob. Cabinets installed adjacent to the hood
must be at least 420 mm above the hob, as shown in
Figures C and D.
HOOD
420
Min.
min.
650
mm. with hood
min.
700
mm. without hood
mm.
600
Min. mm.
420
Min. mm.
HOOD
900
Min. mm.
420
Min.
min.
650
mm. with hood
min.
700
mm. without hood
mm.
420
Min. mm.
Fig. C Fig. D
Making the Gas Connection
T
he appliance should be connected to the mains or to a
gas cylinder in compliance with current directives. Before
making the connection, check that the cook er is regulated
for the gas supply y ou are using. If not, f ollo w the instruc-
tions indicated in the paragraph “Conver ting to Different
Types of Gas." On some models the gas supply can be
connected on the left or on the right, as necessary; to
change the connection, reverse the position of the hose
holder with that of the cap and replace the gasket (sup-
plied with the appliance). When using liquid gas from a
cylinder , install a pressure regulator which complies with
the National Regulations.
Important: Check that the supply pressure complies with
the v alues indicated in table 1 “Burner and Nozzle Char-
acteristics” since this will ensure safe operation, correct
consumption and ensure a longer lif e f or your appliance.
Connection with a Hose
Make the connection using a gas hose that complies with
requirements set for th by the current standards. The in-
ner diameters of the pipe are as f ollo ws:
- 8 mm f or liquid gas;
- 13 mm for methane .
When installing the hose, remember to tak e the following
precautions:
• No part of the hose must come into contact with parts
whose temperature exceeds 50°C;
• The length of the hose should be less than 1500 mm;
• The hose should not be subject to twisting or pulling,
and should not have bends or kinks;
• The hose should not touch objects with sharp edges,
corners or moving parts , and it should not be crushed;
• The full length of the hose should be easy to inspect in
order to chec k its condition.
Check that the hose fits firmly into place at the two ends
and fix it with clamps complying with current standards. If
any of the above recommendations can not be followed,
flexible metal pipes should be used. If the cooker is in-
stalled in compliance with the requirements for class 2,
subclass 1, it is highly recommended that the gas con-
nection be made with a fle xible metal pipe in compliance
with current saf ety standards.
Connecting a Flexibl e, Jointless, Stainless Steel
Pipe to a Threaded Attachment
Remov e the hose holder fitted on the appliance . The gas
supply pipe fitting is a threaded 1/2 gas cylindrical male
attachment. Use only pipes and seals that comply with
current National Regulations. The full length of the pipe
when installed must not e xceed 2000 mm. After the con-
nection has been made, make sure that the fle xible metal
pipe does not come into contact with mov eable parts and
that it is not crushed.
Checking the Seal
Important: Once the installation has been completed,
chec k to make sure that the seals on all the connections
are tight, using a soap y solution (ne ver a flame).
Connecting the Power Suppl y Cord to the Mains
Install a nor malised plug corresponding to the load indi-
cated on the data plate. When connecting the cable di-
rectly to the mains, install an omnipolar circuit-breaker with
a minimum contact opening of 3 mm between the appli-
ance and the mains. The omnipolar circuit breaker should
be sized according to the load and should comply with
current regulations (the earth wire should not be inter-
rupted b y the circuit breaker). The supply cable should be
positioned so that it does not reach a temperature of more
than 50°C with respect to the room temperature, along its
length. Before making the connection, chec k that:
• The limiter valve and the home system can support
the appliance load (see data plate);
• The mains are properly earthed in compliance with cur-
rent saf ety standards and regulations;
• There is easy access to the socket and omnipolar cir-
cuit break er, once the hob has been installed.
N.B.: Ne v er use reducers, adaptors or shunts since they
can cause heating or burning.
Converting the Cooker to Different Types of Gas
In order to conver t the cooker for use with a type of gas
different than the one for which it was factory set (indi-
cated on the label attached to the lid), the follo wing steps
must be taken:
a) Replace the hose holder mounted on the appliance
with that supplied in the bag of “cooker accessories.”
Important: The hose holder for liquid gas is marked 8,
the hose holder for methane. In any case, always use a
new sealing gasket.
b) Replace the burner nozzles on the hob:
• Remove the grids and slide the burners from their
housings;
• Unscrew the nozzles using a 7 mm socket spanner,
and replace them with nozzles f or the new type of gas
(see tab le 1 “Burner and Nozzle Characteristics”).
• Replace all the components by repeating the steps in
re verse order .
Ваш отзыв будет первым
Вопросы пользователей
Поиск:
по производителю
по типу техники
по модели
Сортировать:
по дате

c ответами

Гость
07 февраля 2021, Нижний Новгород
не работает росжиг
0 ответов
Ответить

 0
0