
- Тип техники
- Бренд
Просмотр инструкции плиты Ariston C 3V7 M.3 (W) R, страница 2
3
The following instructions should be read by a qualified
technician to ensure that the appliance is installed,
regulated and technically serviced correctly in compliance
with current regulations .
Important: disconnect the cooker from the electricity when
making any adjustement, maintenance operation, etc.
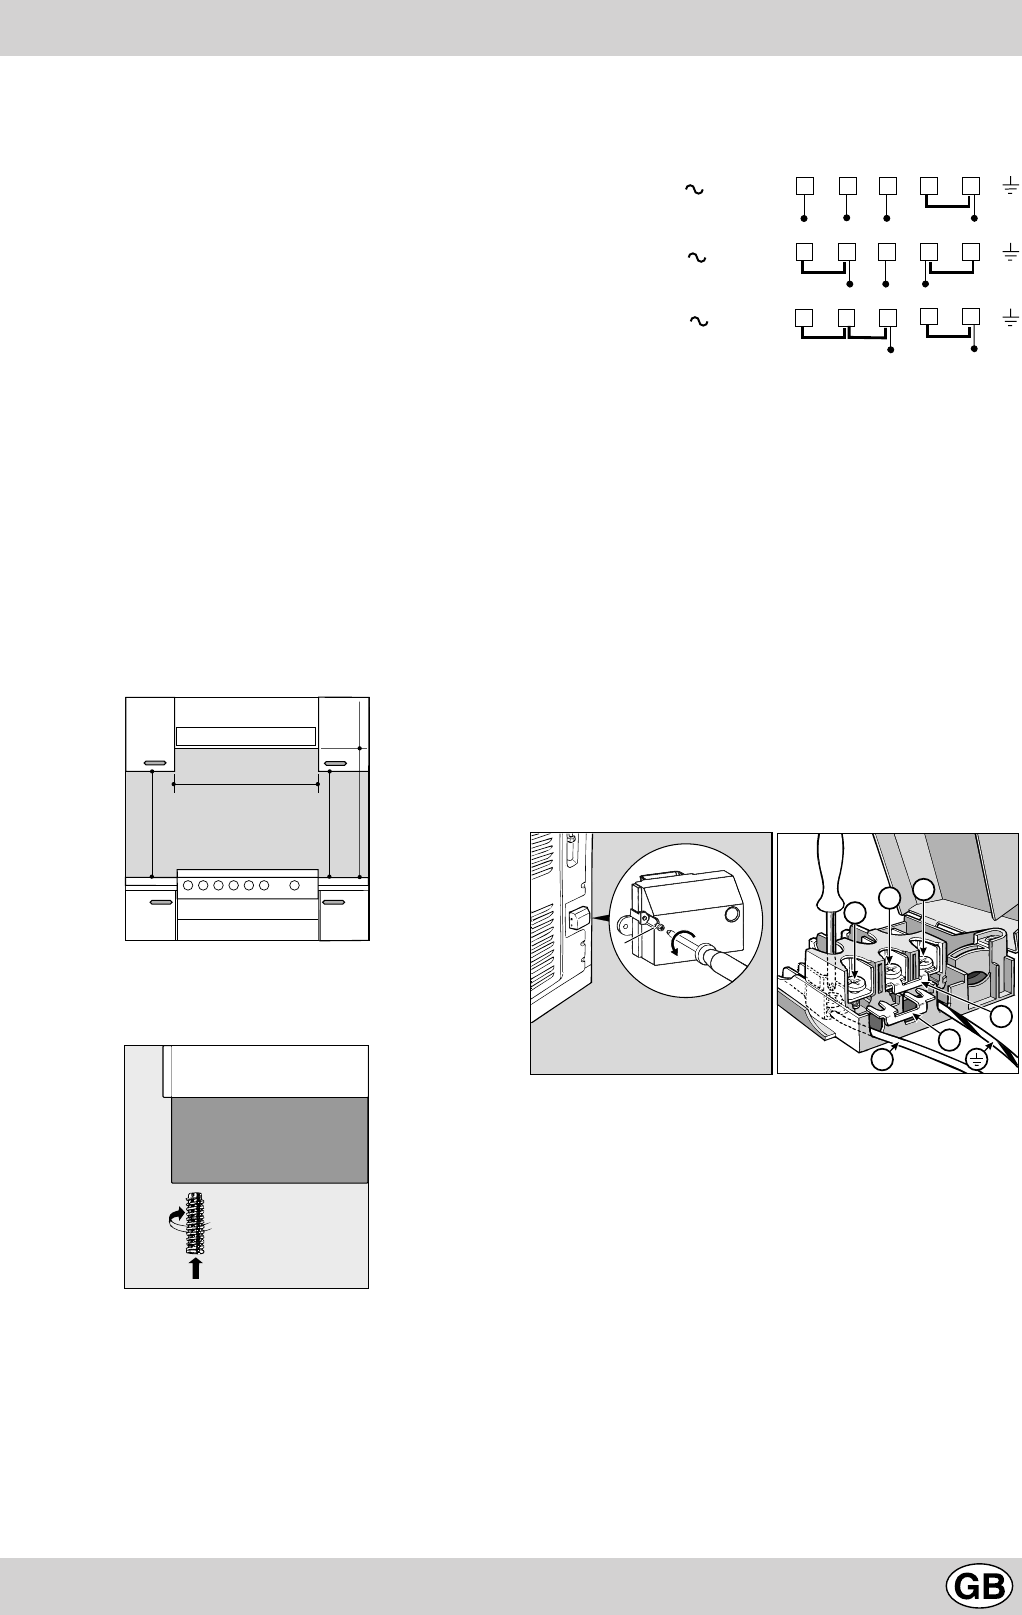
P ositioning
The appliance can be installed next to furniture units which
are no taller than the top of the cooker hob. For proper
installation of the cooker, the following precautions must
be tak en:
a) Kitchen cabinets installed next to the cooker that are
taller than the top of the hob must be situated at least
200 mm from the edge of the hob .
b) Hoods must be installed according to the requirements
in the installation manual for the hoods themselv es and
in any case at a minimum distance of 650 mm.
c) Place the wall cabinets adjacent to the hood at a
minimum height of 420 mm from the hob (see figure).
d) Should the cooker be installed beneath a wall cabinet,
the latter should be situated at least 700 mm
(millimetres) awa y from the hob, as shown in the figu-
re .
e) the cut-out for the cooker cabinet should have the
dimensions indicated in the figure.
Levelling
In order to hav e a perfect levelling of the cooker adjustable
feets are supplyed. They can be screwed in the seats
positioned in the corners of the cooker base.
Electrical connection
The power supply cable since its size depends on the
electric connection (see the following connection diagram).
Feeding cable installation
Terminal block opening:
· Unscrew screw “V”
· Pull and open the junction b lock lid
For the installation of the feeding cable carry out the
following operations:
· position the small connection A-B according to the type
of connection that has to be performed using the
scheme shown in the figure .
Note: the small connections are prepared by the F actory
for the 230V monophase connection (contacts 1-2-3 are
connected to one another). The bridge 4-5 is situated in
the lower part of the terminal block.
· introduce the cables (N and
6
) as shown in the figure
and tighten the relativ e scre ws .
· fix the remaining cab les on the 1-2-3 clips.
· fix the f eeding cable in the special cable stop and close
the co ver fastening it with the screw “ V ”.
Connecting the supply cable to the mains
Fit a plug, nor malised for the load indicated on the data
plate, on the cab le; when making the connection directly
to the mains, an omnipoIar switch with a minimum opening
of 3 mm between the contacts, must be installed between
the appliance and the mains. This switch must be sufficient
for the load and must comply to regulations in force (the
earthing wire must not be interrupted by the switch). Th e
power supply cable must be positioned so that it does not
exceed 50°C more than room temperature at any point of
its length. Before making the connection chec k that:
· the limiter valve and the home system can support the
appliance load (see data plate);
· the power supply system has an efficient earthing
connection which complies with the provisions of
current regulations;
· the socket or omnipoar circuit-breaker is easily
accessib le once the cook er has been installed.
Installation
HOOD
420
Min.
min.
650
mm. with hood
min.
700
mm. without hood
mm.
600
Min. mm.
420
Min. mm.
1 2
3
4
5
12345
1
2
3
4
5
R
S
T
N
R
S
N
R
N
400 3N
H05RR-F 5x2.5 CEI-UNEL 35363
400V 2N
H05RR-F 4x2.5 CEI-UNEL 35363
230V 1N
H07RN-F 3x4 CEI-UNEL 35364
V
1
2
3
N
A
B
Ваш отзыв будет первым
Вопросы пользователей
Поиск:
по производителю
по типу техники
по модели
Сортировать:
по дате

c ответами

Натали
10 апреля 2022, Красноярский
ariston c 302 mr инструкция, к температуре и положения ручек к духовочному шкафу, пожалуйста
0 ответов
Ответить

 2
2
Елена
18 марта 2019, Москва
Здраствуйте, у моей мамы старая добрая плита Аристон 7 поваров. Мама старенькая, не помнит уже про нее ничего. Ручки переключателей с цифрами и указанием режимов стерлись. Можно ли в сервисе где-то купить новые. и заменить старые. Или хотя бы, вы можете выслать инструкцию на русском языке и фото этих ручек, чтобы я смогла ей маркером подписать, где какой режим. Спасибо.