
- Тип техники
- Бренд
Просмотр инструкции стиральной машины Gorenje WT52092, страница 25
25
EN5 / MAINTAINING YOUR MACHINE
2
1
CLANG
1
2
A
D 15
D 20 D 21 D 22 D 23
D 24
D 25
D 16 D 17 D 18 D 19
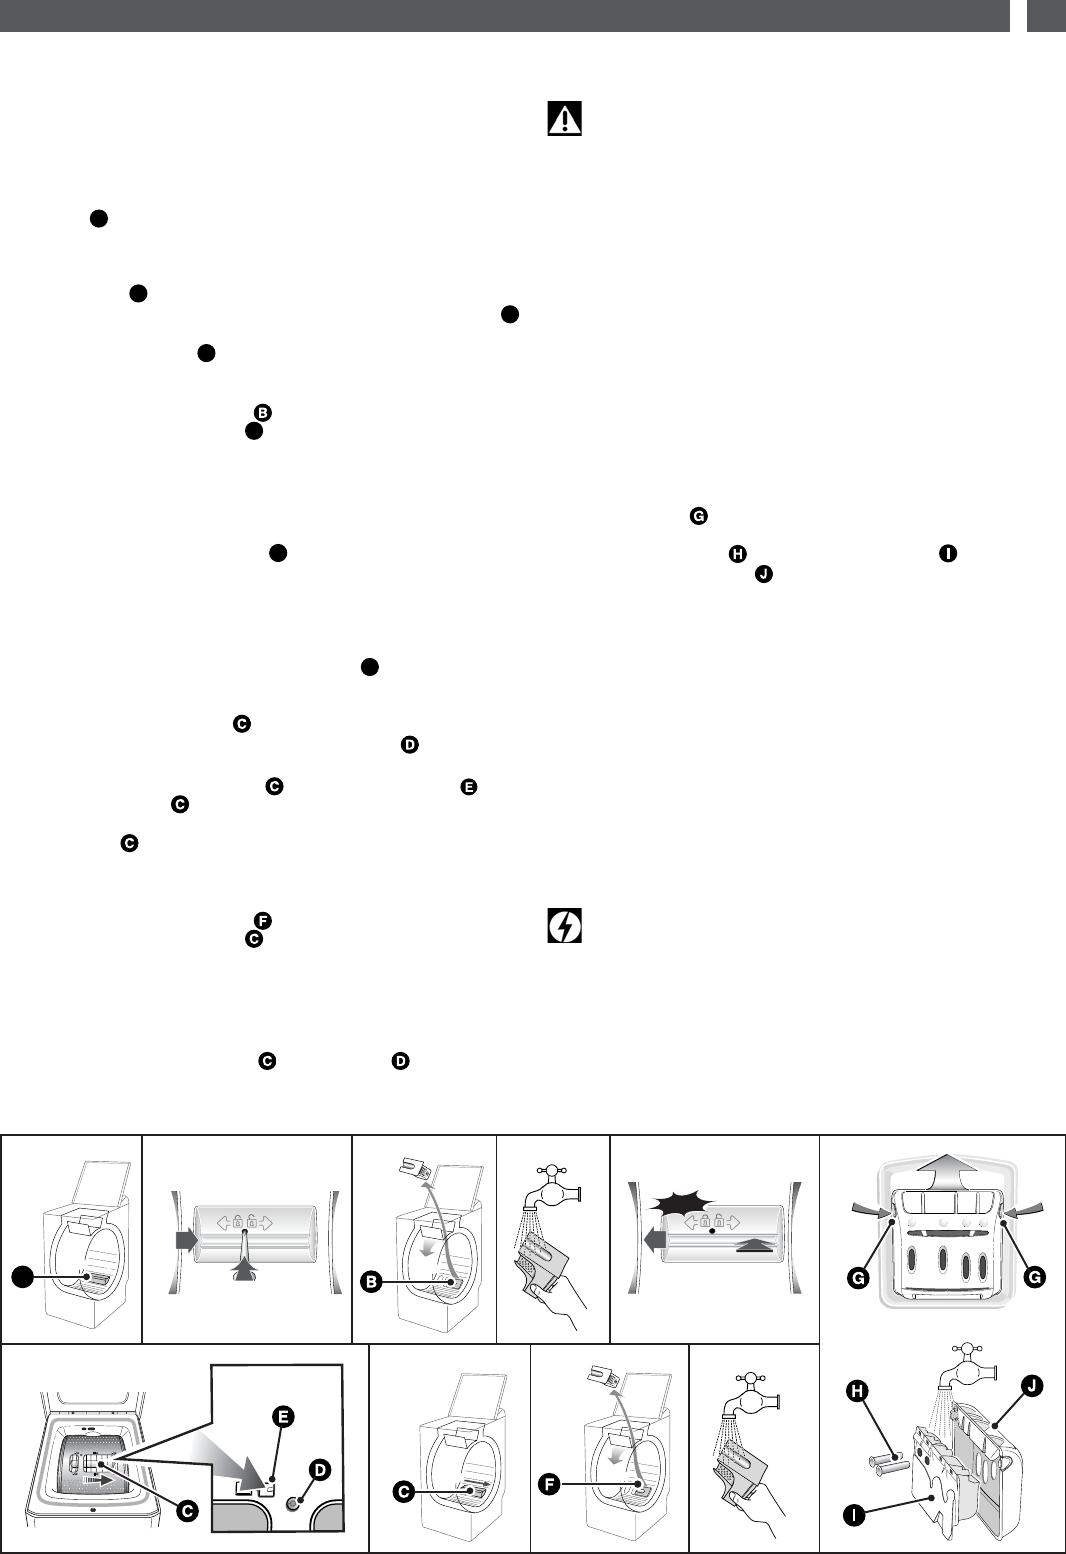
•CLEANING THE PUMP FILTER
(Option 1)
The way to access your pump filter may differ according to the model
of the machine (see options 1 and 2).
This filter collects the small objects you may have inadvertently left in
your clothes and prevents them from disrupting the pump’s operation.
To clean the filter, proceed as follows:
— Open the drum doors. At the back of the drum, you will see a plastic
component
(Diagram D15)
— Release this
(Diagram D16)
.
To do this:
- Insert a rod (a pencil or a screwdriver, for example) into the hole in
the component
- Press down vertically with the rod, while pushing the component
over to the right until it is released from its housing
— Remove the component
— Turn the drum slightly towards the front of the machine, with the doors
open
(Diagram D17)
You can access the pump filter through the openings freed by
removing the plastic component .
— Remove the filter from its housing
(Diagram D17)
— Remove the various objects it may have in it
— Rinse it under the tap
(Diagram D18)
— Re-insert it, pushing it firmly into its housing after checking that the
housing is clean
— Re-insert the plastic component , ensuring that it is positioned
correctly in the openings at the bottom of the drum and pushing it to
the left until it is fully engaged
(Diagram D19)
.
•CLEANING THE PUMP FILTER (Option 2)
if your machine dopes not have the component shown in Diagram
D16, you must proceed as follows to clean your pump filter:
— Turn the drum to position the closed doors facing downwards: this
will reveal a plastic component
(Diagram D20)
— If your machine is fitted with one, remove the screw
— On certain types of machines, the component has a clip.
In this case, release the component by pressing on this clip while
sliding the component gently to the right
— Then, in all cases, turn the drum again, open the doors and remove
the component by sliding it in the direction of the arrow
(Diagram
D21)
— Turn the drum slightly towards the front of the machine, with the doors
open
(Diagram D22)
.
You can access the pump filter through the openings freed by
removing the plastic component .
— Remove the filter from its housing
(Diagram D22)
— Remove the various objects it may have in it
— Rinse it under the tap
(Diagram D23)
— Re-insert it, pushing it firmly into its housing after checking that the
housing is clean
— Re-insert the plastic component and the screw by performing
all the above operations in reverse order.
•CLEANING THE MACHINE
Important :
To clean the casing, the control panel and all the plastic parts
in general, use a sponge or a soft cloth dampened only with water
and liquid soap.
In all cases, do not use:
— Abrasive powders
— Metal or plastic sponges
— Alcohol-based products (alcohol, thinners, etc.)
•CARE OF THE INTERNAL COMPONENTS
To ensure better hygiene, we recommend that you:
— Leave the lid open for a short time after washing.
— Clean the plastic and rubber access components to the tank approximately
once a month using a slightly chlorinated product. Run a rinsing cycle to
remove any residue of this product.
— Run a washing cycle at 90°C at least once a month.
•CLEANING THE PRODUCTS’ BOX
Clean the products’ box regularly.
To do this:
— Press the bosses on each side of the box simultaneously to extract
it from its housing
(Diagram D24)
.
— Remove the siphons from the rear of the box and separate
the box from its front cover
(Diagram D25)
— Rinse everything under the tap (taking care to empty any excess water
remaining inside the box).
— Refit all the box’ components, ensuring that the box section itself is
properly clipped into the cover and then re-insert the complete assembly
into its location under the machine’s lid.
•PERIODIC CHECKS
To avoid any water damage, we recommend that you regularly check
the condition of the water and drain hoses. If you notice the slightest
cracking, do not hesitate to replace the hoses with identical ones available
from the manufacturer or his After-Sales Service. For how to replace
the water supply hose, please refer to the section “CONNECTING TO
THE COLD WATER SUPPLY”
•REPLACING THE POWER SUPPLY CABLE
Warning:
For your safety, the power cable and, depending on the
model, the complete electric box and its associated cable must only
be replaced by the manufacturer’s After-Sales Service or a qualified
electrician.
A
A
A
A
A
A
A
Ваш отзыв будет первым