
- Тип техники
- Бренд
Просмотр инструкции пылесоса Zanussi ZAN3600_ZAN3610_ZAN3615_ZAN3625_ZAN3626_ZAN3630, страница 2
20 21 22
23 24 25
28
31
30
26
27
33
34
32
35
1
2
3
4
5
6
7
8 9
10
11
12
13 14
15
16
17
18 19
Safety precautions
This appliance is not intended for use by persons (including
children) with reduced physical, sensory or mental
capabilities, or lack of experience and knowledge, unless
they have been given supervision or instruction concerning
use of the appliance by a person responsible for their safety.
The vacuum cleaner features double insulation and does not
need to be earthed.
Children should be supervised to ensure that they do not
play with the appliance.
Never vacuum:
• In wet areas.
• Close to ammable gases, etc.
• Without a dust bag (this may damage the cleaner). A
safety device is fitted which prevents the cover to close
without a dust bag. Do not attempt to force cover to close.
• Sharp objects.
• Fluids (this can cause serious damage to the machine).
• Hot or cold cinders, lit cigarette butts, etc.
• Fine dust from plaster, concrete, or or ash, for example.
The above can cause serious damage to the motor —
damage which is not covered by the warranty.
Electrical cable precautions:
• If the supply cord is damaged, it must be replaced by the
manufacturer, it’s service agent or similary qualified
person in order to avoid a hazard. Damage to the
cleaner cable will not be covered by the warranty.
• Never pull or lift the vacuum cleaner by the cable.
• Disconnect the plug from the wall socket before cleaning
or maintaining the vacuum cleaner.
• Regularly check that the cable is not damaged. Never use
the vacuum cleaner if the cable is damaged.
All service and repairs must be carried out by an authorised
Electrolux service centre. Always keep the vacuum cleaner in
a dry place.
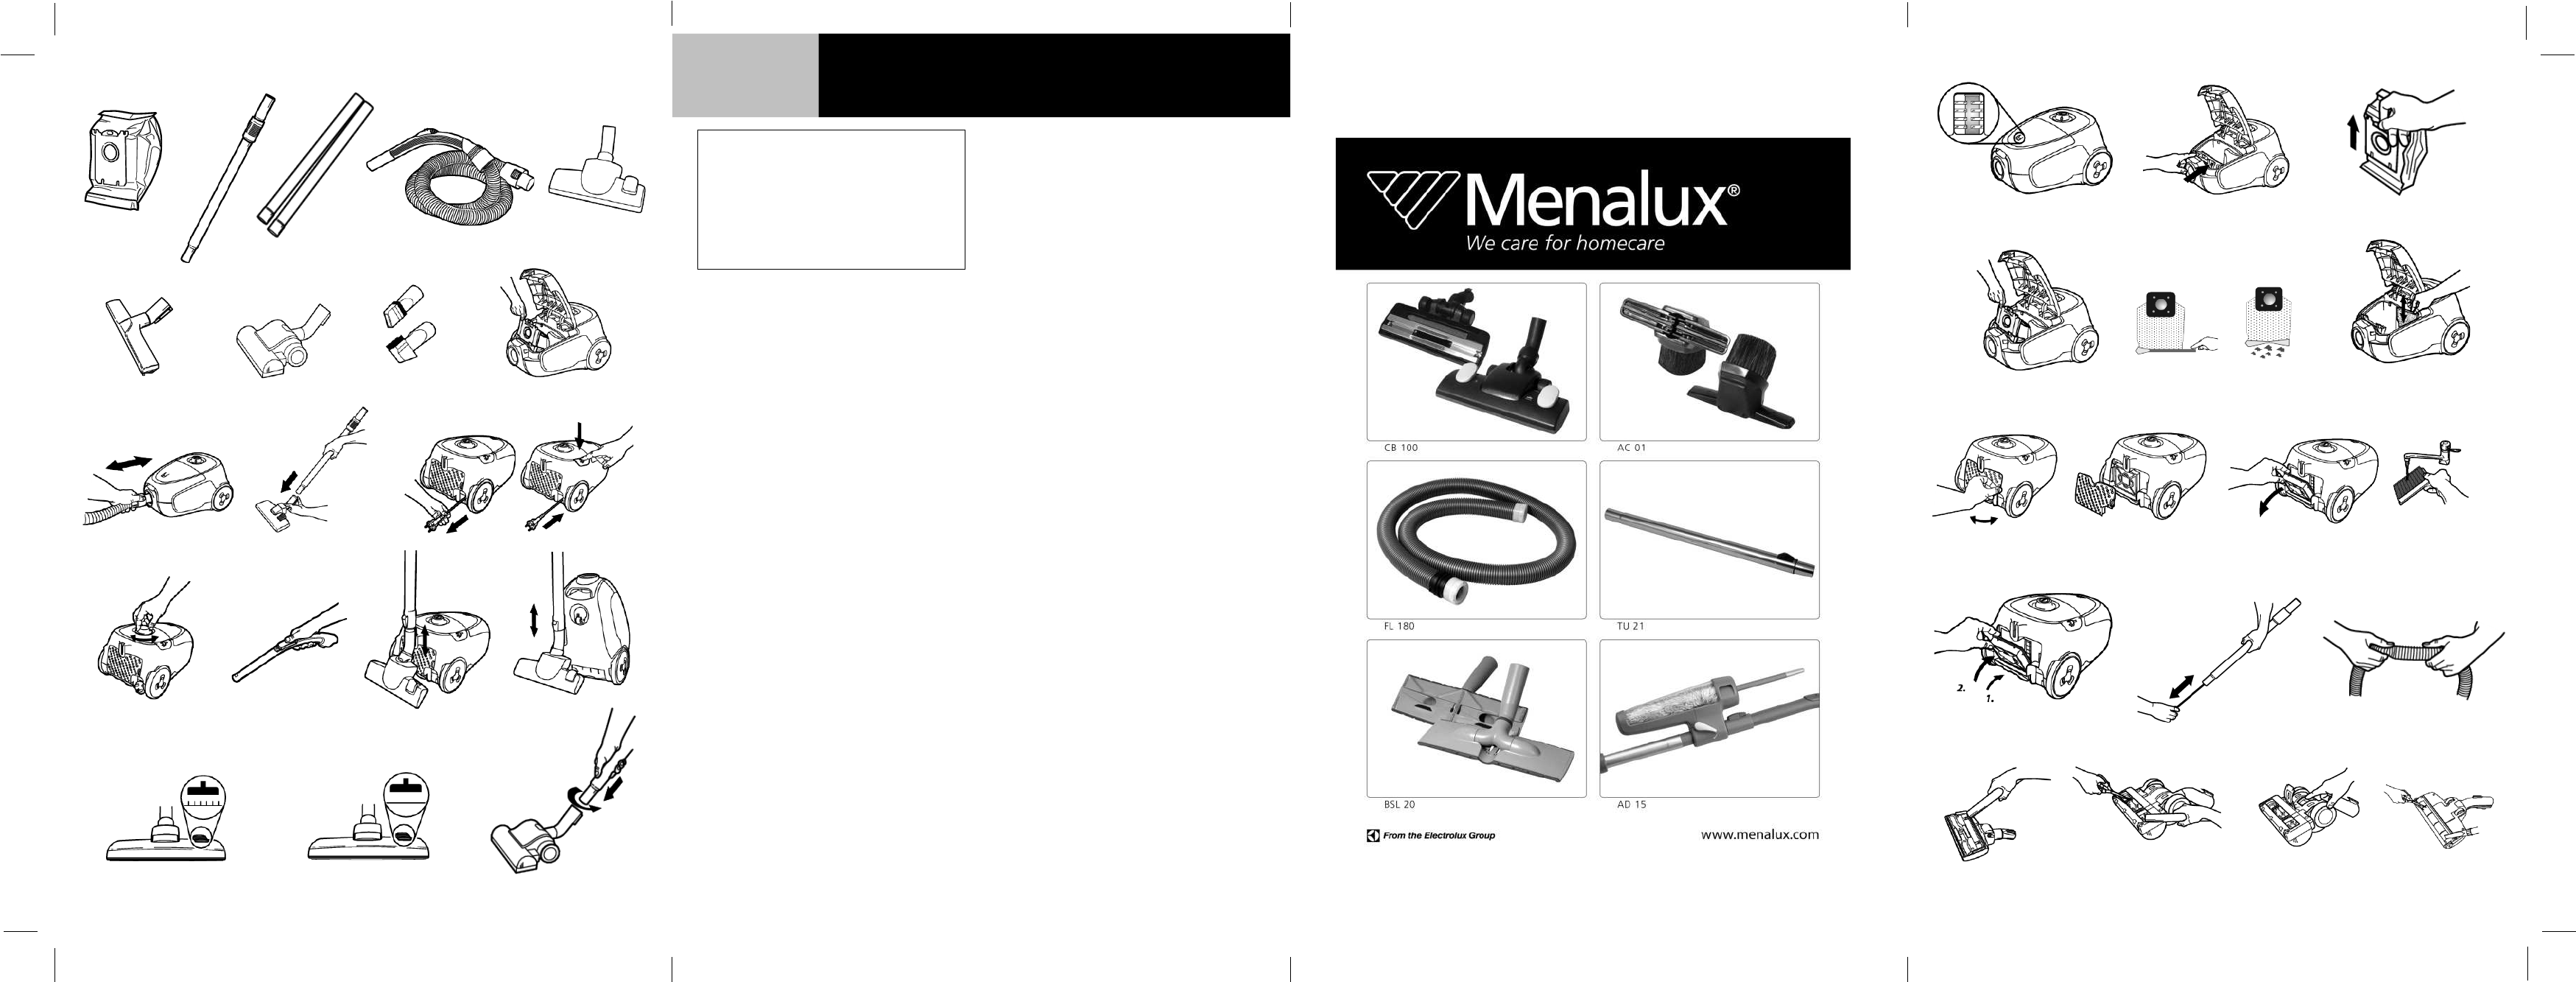
Before starting
(9.) Check that the dust bag and motor filter are in
place.
(10.) Insert the hose until the catch clicks to engage
(press the catch to release the hose).
(11.) Attach the extension wand or telescopic wand (only
on certain models) to the hose handle and oor
nozzle (to take them apart again, twist and pull).
(12.) Extend the cord and plug it into the wall socket.
The vacuum cleaner has an integrated cord
winder. To rewind the cable press the foot pedal
(take hold of the plug to prevent it striking you).
(13.) Start the vacuum cleaner by rotating the power
control button.
(13./14.) Adjust suction power using the power control
button on the vacuum cleaner or the suction
control on the hose handle.
(15.) A practical parking feature (as well as minimizing
the risk of breakage) makes things easier when
pausing during cleaning.
(16.) The parking feature makes it easier to move and
store the vacuum cleaner.
Use the nozzles as follows:
Carpets: Use the carpet/hardfloor nozzle with the lever in
position (17). Reduce suction power for small carpets.
Hard floors: Use the carpet/hardfloor nozzle with the lever
in position (18).
Wooden floors: Use the parquet nozzle (certain models
only, 6).
Special combined nozzle: Detach the nozzle from the
accessory dock and use it for bookshelves (with folding out
of the „brush” end) or crevices, corners (with the „crevice”
end) (8.)
Using the turbo nozzle
(certain models only) (7a)
(19.) Attach the nozzle to the tube.
Note: Do not use the power or turbo nozzle on fur rugs, rugs
with long fringes or a pile depth exceeding 15 mm. To avoid
damaging the carpet, do not keep the nozzle stationary
whilst the brush is rotating. Do not pass the nozzle across
electric cables, and be sure to switch off the vacuum cleaner
immediately after use.
Replacing the dust bag/cleaning the filter
Changing the dust bag
The dust bag must be replaced latest when the indicator
window is completely red. Read with the nozzle lifted up
(20.).
1. Open the lid.
2. Push the dust bag holder backward (21.) and close
the bag by sliding tab (22.).
3. Lift out the dust bag (23.).
Beware: Lift out the bag carefully if it’s completely full.
4. Insert the new dust bag from upside by pushing the
holder backward again.
5. Before closing the lid make sure the holder is in the
forward position and the dust bag cardboard is
over the pipe-stub.
Accessories
1 Dust bag
2* Telescopic tube
3* Extension tube (2)
4 Hose handle + hose
5 Carpet/hardfloor nozzle
6* Parquet nozzle
7* Turbo nozzle
8 Combination nozzle
1
English
29
36
37
Ваш отзыв будет первым